
(Discount Coupon Available Below)
In photography and Image Processing HDR (High Dynamic Range) is a technique that allows a much greater range of light intensity from the lightest to the darkest area of an image than a regular image produced by a common camera. Tone mapping techniques aim to reduce the overall contrast so that an image with greater luminosity range can be displayed on devices that are not capable of showing that range while, at the same time, maintaining localized contrast. This can also be exaggerated in order to create artistic effects.
True high dynamic range photos can be obtained by capturing multiple shots of the same scene with different exposures and merging them in a software like HDRSoft’s Photomatix. This is what I use for all my HDR needs.
Now, I can already hear some of you groaning: “HDR looks so fake…” – Well, it doesn’t have to. As a matter of fact, HDR can look as real as human eye can see (remember that our eyes can see by far a much greater contrast than the sensor of the best camera in the market), or as artistic as you want it to be. In my experience as a photographer I came across all sort of HDR/Tone Mapped images and I can guarantee you that a job well done cannot be always told apart from non-HDR/Tone Mapped images.
There were times when a photographer would have to give up a particular shot (or be very creative about it) because the light just wasn’t right. Your classic example would be a dark interior with bright light coming from the windows: you want to show the interior as well as the scenery outside of the windows but the sensor of your camera (or the film) cannot resolve such a high contrast; it’s either one or the other. Photoshop has many times come to our help: if the contrast isn’t excessive we could create an adjustment layer and modify highlights, shadows, etc. in a particular area of the image. In case of excessive contrast, though, that technique can only get a close approximation to reality, I’m saying a close approximation because for as powerful as it is, Photoshop cannot create data that is not there, the missing highlights were not captured in the first place, and the part of the image that is too dark cannot be lightened over a certain amount or it will become highly noisy. Landscape photographers face scenes with high contrast all the time and many times we have been able to overcome this problem by using a split neutral density filter. Unfortunately it only works when there is a net distinction between the dark side and the bright side of the image, as when we are taking the photo of a sunset over the sea. Suppose you want to shoot a “tunnel” created by a canopy of trees where the ground is dark, the canopy itself is brighter and the “end of the tunnel” is really bright; or maybe you want to shoot the movement of the waves under a boardwalk. Fortunately, for these and many other situations, HDR software comes to our help. There are many programs out there, and even Photoshop CS4 can merge to an HDR image (with a serious lack of options and a serious lack of speed), but in my opinion the best one in the market is Photomatix. I don’t want to get into fine details because the web abounds of reviews of this excellent program as well as tutorials so let’s just take a look at some of the features…
First of all, Photomatix is very easy to use, you can actually drag and drop images in its interface and with just a few clicks that don’t require anything more than following on-screen instructions you get your first HDR image. For the power users, though, the possibilities are nearly endless. There are so many ways to tweak you final results that you could spend hours playing with it (and you probably will).
The program comes as a stand-alone as well as plug-ins for Photoshop CS2, CS3, CS4, Lightroom and Aperture. At the start-up of the stand-alone application we are presented with an empty window and a small menu window (the Workflow Shortcuts window). Click on “Generate HDR image” or “Exposure Fusion” then browse and select or drag & drop the images that you want to use (these can be either RAW or JPEG). In the next step we choose if we want to align hand-held images and how (I find that the option “matching features” gives better results); Reduce Noise and Chromatic Aberrations, Reduce Ghosting Artifacts (in case you have movement in the images, like leaves); and then some more options that are specific to JPEG or RAW. We click OK and let the software work. After some time which varies on the complexity and size of the image, the file format, and how powerful your computer is, we are shown a preliminary version to which we will apply Tone Mapping using standard setting or customizing any or all of the many options available. After playing with the interface for a while we can create a pretty realistic scene. We can also save a lot of time with the Batch Processing interface that is filled with options ranging from the number of exposures to the Color Profile and a lot more.
As I mentioned, the software can do an alignment of multiple exposures for hand-held shots. I prefer to use a tripod, but it’s not always possible and the results I’ve seen with the automatic alignment are great.
Photomatix comes both in 32 bit and 64 bit versions for Windows and Mac. The 64 bit version naturally only runs in 64 bit Operating Systems. A 32 bit Operating System can only address up to 3 GB of RAM because of physical limitations that cannot be overcome. If you want to use 4GB of RAM or more you need to use a 64 bit version of the OS or this will see the amount of memory but will not be able to address it. My main computer is a custom built PC with Windows 7 64bit and Photomatix 64bit runs flawlessly on it. If you are upgrading your PC from XP or Vista to 7, the good news is that the upgrade DVD contains both versions. As with all upgrades there might be some incompatibilities between old 32bit software and a 64bit OS but so far (and I was a beta tester of Windows 7 64bit since July 2009) I have found none; even Photoshop CS4 and Lightroom 2.0 come with 32 bit and 64 bit versions. On the plus side, if you have more than 3GB of RAM your PC will always run at the very least a bit faster in the 64bit version. Personally, I don’t think photographers and video editors should be allowed to use 32bit Operating Systems 🙂
These are the version of Photomatix and Plug-ins available for sale:
Photomatix Light is a stand-alone program which allows the merging of bracketed exposures into one single image with Tone Mapping or Exposure Fusion and also does an automatic alignment of hand-held photos.
Plug-In for Photoshop CS2, CS3, CS4 provides a tone mapping method for this well known Adobe software.
Photomatix Plug-In for Aperture 2.1 or higher provides HDR Tone Mapping, automatic alignment of hand-held photos, and options for reduction of noise and chromatic aberrations in HDR images.
Photomatix Pro is a stand-alone program with options for Exposure Fusion, HDR Tone Mapping, Automatic Alignment of hand-held photos, reduction of ghosting, noise and chromatic aberration in HDR images, Batch processing and includes an Adobe Photoshop Lightroom plug-in. It can also convert a single RAW image into a pseudo-HDR image with Tone Mapping and an option to modify the White Balance.
Photomatix Pro Plus Bundle includes Photomatix Pro as well as the Photoshop and Aperture plug-ins.
HDRSoft has agree to provide a 15% Discount using coupon code: LucaDianaPhoto
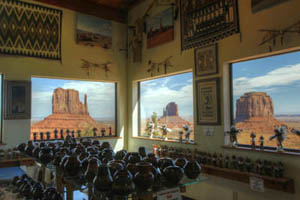
EXAMPLES:
The three original Exposures This is the final result optimized in Photoshop for contrast in the windows


